
Looking for a creative way to display your favorite photos or give a handmade gift? This DIY rustic photo frame made from popsicle sticks is simple, affordable, and charmingly crafty. Perfect for kids, teens, or adults who love a quick and satisfying project.
What You’ll Need:
-
8–10 large popsicle sticks (craft sticks)
-
Hot glue gun (or craft glue)
-
Scissors or small clippers
-
Acrylic paint or wood stain (optional)
-
Twine or ribbon (for hanging)
-
Cardboard (for backing)
-
Your favorite printed photo
-
Decorative extras: buttons, stickers, faux flowers, etc. (optional)
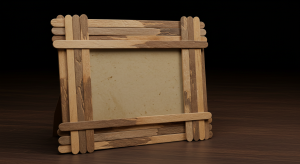
Step 1: Build the Frame Shape
Lay down four popsicle sticks to create a square or rectangle, depending on your photo size. Overlap the edges slightly and glue them together at the corners. For a thicker border, layer additional sticks on top.
Step 2: Customize with Paint or Stain
Add a rustic, colorful, or elegant touch by painting or staining the sticks. You can go with a natural wood look, pastel shades, or even bright bold colors. Let it dry completely.
Step 3: Add Decorative Touches
Glue on small embellishments like faux flowers, buttons, or wooden letters to personalize your frame. This step is totally optional but adds fun flair.
Step 4: Attach the Photo and Backing
Cut a piece of cardboard slightly smaller than the frame. Glue your photo onto the cardboard, then attach the photo-backed cardboard to the back of the frame using glue.
Step 5: Add a Hanger
Cut a small piece of twine or ribbon and glue the ends to the top corners of the back of your frame. This creates a rustic hanger. Alternatively, you can glue a magnet strip to the back to display it on your fridge.
You’re Done!
Hang your DIY frame, gift it to a friend, or prop it on a desk or shelf. This easy project is a perfect way to turn memories into handmade decor!
Tips & Variations:
-
Use glitter glue or metallic paint for a glam finish.
-
Make mini frames as party favors or ornaments.
-
Layer multiple frames into a gallery-style wall collage.